Do You Need to Lime the Lawn

Like most things in nature, the soil supporting your lawn (technically called turfgrass) must be in balance. In this case, the balance is a measure of pH or acidity. If your soil is too low on the pH scale, adding lime can help restore the balance and promote a healthier lawn. A quick understanding of the basics of pH, how to test your soil and when and how to apply lime are all you need to get started.

Why Use Lime?

Adding lime is the most common method of changing pH of the soil. Soil pH is a measure of a soil alkalinity or acidity. A pH of 7.0 is neutral. Anything below 7.0 is acidic, and anything above is alkaline. Most turf grasses grow best with a pH of 5.5 to 6.5. If a soil tests lower than 5.5, it likely will benefit from added lime.

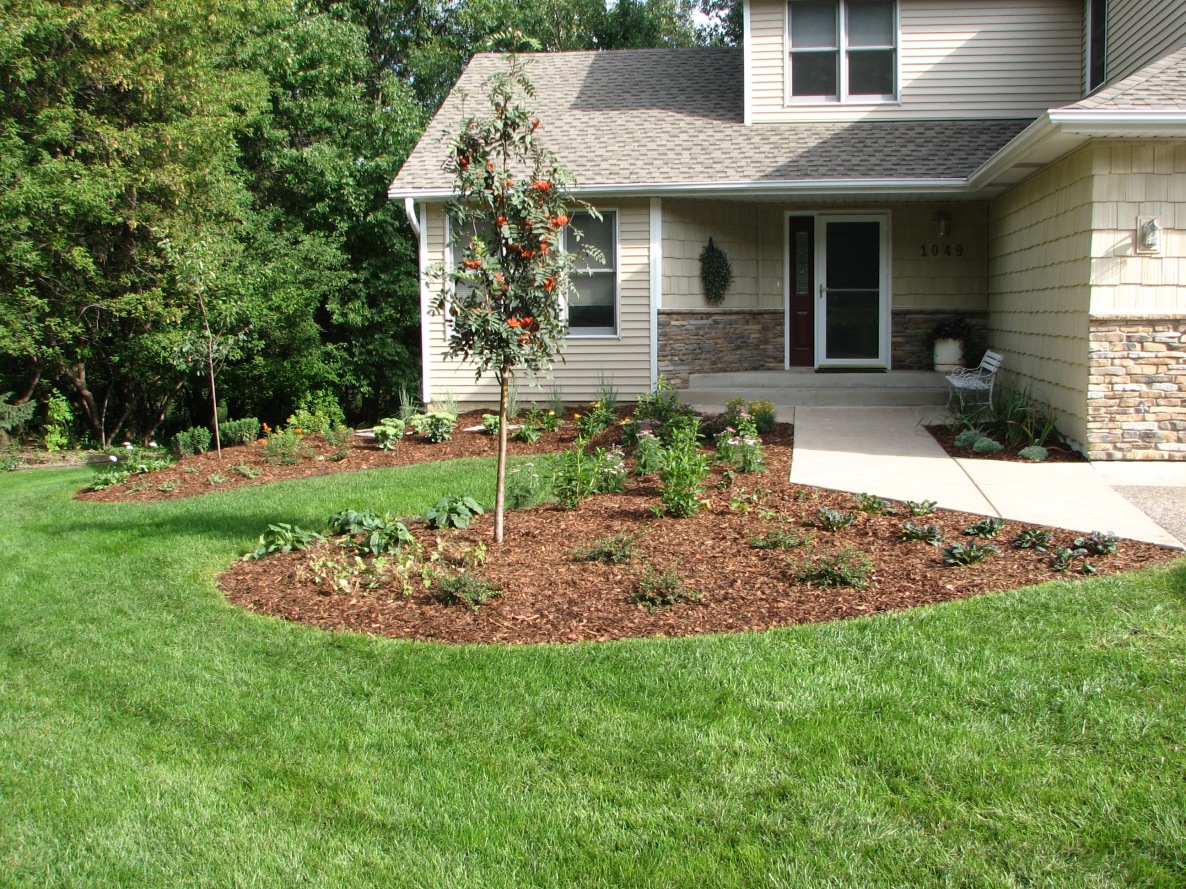
Soils can be naturally acidic but can also be acidified over time by natural leaching, the use of some nitrogen fertilizers, excessive rainfall or irrigation, and acidic water sources. Low pH affects microbial activity in soil, making nutrients less available to grass and other plants. As a result, turf declines. Common symptoms of low pH include loss of color, reduced vigor and diminished ability to recover from heat and drought stress.

Types of Lime

The lime you apply to a lawn is limestone or chalk. The main component is calcium carbonate. There are several types of lime, and a good soil test should tell you which type of lime you need.

Lime with a high calcium content is referred to as calcitic lime and has the benefit of adding calcium to the soil. Some limestone contains a significant amount of magnesium and is referred to as dolomitic lime. Dolomitic lime adds magnesium to the soil and could be used if soil tests indicate a magnesium deficiency.

Most types of lime can be applied with a standard lawn spreader.

How to Test Your Soil

You can buy DIY soil test kits at garden centers and hardware stores. A good kit costs about $15 to $20 and tests for pH as well as nutrients, such as nitrogen and phosphorus. The accuracy of the results is difficult to predict, and the information may not tell you how much lime your lawn needs. For the same amount of money (and a little more time, perhaps 2 to 3 weeks), you can have your soil tested at a local extension service. Most university extensions test soil for about $10 to $20 and usually offer a much more detailed analysis of your soil’s composition and pH level.

Follow the extension’s instructions for gathering the soil sample. It’s usually best to gather multiple samples from each large lawn area and mix the samples for each area together before bagging it for testing. Be sure to let the tester know that you want to learn about liming your lawn Care. They will likely perform an SMP buffer test on your sample(s) to indicate how much lime to add.

When to Apply Lime

Lime can be applied to a lawn any time of year that soil isn’t frozen, but it is typically done during spring or fall. It’s best to apply lime after aerating the Lawn Service Brighton Township.

This aids absorption and allows some of the lime to reach deeper into the soil.

Level out an Uneven Lawn With Topdressing

Areas of a lawn can become uneven over time, due to “settling” and other factors. In the least extreme cases, you will want to solve the problem by “topdressing,” which allows you to level out your lawn. Is this problem new to you? If you have never experienced it, you may need a brief introduction to it — and its solution — in order to understand what it is all about. The following exchange between a reader of my Landscaping website and a lawn care expert at Timberline Outdoor Services provides a case study that will help bring you up to speed.

The Problem: Low Spots Develop in a Lawn, Making the Surface Uneven

Reader, Springtime writes, “I have a lawn that was put on over a ledge where the house was build in 2006. Now the lawn is very uneven with dips in the surface that can twist your ankle while walking. The grass is in bad shape too and looks dead in places. One side of the lawn is sloping. What should I do?”

The Lawn Care Brighton Township has given answer to this question bellow:

The Solution: How Bad Are Those Low Spots?

Most of us enjoy our turf grass lawns as a great foundation for outdoor activity. Maintaining our lawns properly is very important, in part, to ensure safe and enjoyable outdoor activity. A lawn needs to be smooth to avoid injuries that might be caused from stepping on an uneven surface. Your grass is the “floor” of an outdoor living space, and floors need to provide stability.

A level and even lawn is also easier to maintain. Who wants to mow a lawn with low spots in it, right?

Not only is it uncomfortable (as when you drive your car over potholes), but it can also cause you to scalp the grass (because, as the mower drops down when the tires pass over low spots, the level of the mower blade also drops, plunging into the higher spots and cutting the grass there much too low).

So what is the solution to the problem of low spots? It really depends on the severity: are we talking about some minor depressions, extreme cratering, or something in between? The solution differs accordingly, which is why the response must be broken up into three parts, which we will term Methods 1, 2, and 3: Landscaping Brighton Township.

Method 1 — Leveling Out a Mildly Uneven Lawn by Topdressing

Topdressing the low spots works well for leveling mildly uneven areas; it is the least invasive approach. Here is what to do:

  1. According to the Lawn Mowing Brighton Township, in a wheelbarrow or similar container, mix up a batch of topsoil, sand, and compost — basically, a soil medium that can support turfgrass growth.
  2. Apply 1/2 inch of this soil mixture on top of the low areas. Do not make it deeper than that, because this approach must be gradual, so that you do not smother the grass.
  3. Rake the topdressing to spread it out evenly.
  4. With a push-broom, work the soil mixture in between the blades of grass as thoroughly as possible.
  5. Monitor the progress in the area. Eventually, you should see just grass, no dirt (assuming there were no bare spots before you began the process of topdressing). If it is still uneven, keep repeating these steps until it is level. If the spot is level now, then you are done.

But if you had bare spots in the area before you started topdressing it, you will have to overseed for the Lawn Service Cumming.

Method 2 — Leveling Out a Moderately Uneven Lawn: “Sweeping the Dirt Under the Carpet”

The topdressing process described above takes time to work. What if you have a few really low spots in your lawn? Obviously, topdressing would not be very effective, because (since you have to proceed 1/2 inch at a time) you would be waiting forever. Yet, since, it is only a few low spots that we are talking about, there would be no need to take the kinds of drastic measures described in Method 3. Fortunately, there is an Lawn Service Brighton Township intermediate method. I call it “sweeping the dirt under the carpet,” because you are essentially picking up sod (the carpet) and putting dirt under it. This method works as follows:

  1. Remove the sod over the low spot (if the area is bigger than 1 foot square, cut out multiple chunks, since a piece of sod greater than 1 foot square is hard to move around without breaking) and set it aside.
  2. Shovel enough topsoil into the hole that, once you replace the sod, the area will be even.
  3. As you shovel the soil into the hole, add water. This will remove air pockets. The last thing you want is for the sod to settle after you have finished — which would defeat the whole purpose of the project.
  4. Replace the sod and water the grass.

Method 3 — How to Level Out a Lawn That Looks Like a Moonscape

Finally, we come to the most extreme end of the spectrum. Is your lawn so littered with craters that it looks like the surface of the moon? If the uneven areas are substantial enough and numerous enough that neither topdressing nor the sweep-the-dirt-under-the-carpet method will solve the problem, then you may need to do a more major renovation by regrading the area and establishing a new stand of turfgrass. To accomplish this, you need to take the same steps that you would take to establish a new lawn, except that you are applying these steps to a smaller area.

Level out an Uneven Lawn With Topdressing

Areas of a lawn can become uneven over time, due to “settling” and other factors. In the least extreme cases, you will want to solve the problem by “topdressing,” which allows you to level out your lawn. Is this problem new to you? If you have never experienced it, you may need a brief introduction to it — and its solution — in order to understand what it is all about. The following exchange between a reader of my Landscaping website and a lawn care expert at Timberline Outdoor Services provides a case study that will help bring you up to speed.

The Problem: Low Spots Develop in a Lawn, Making the Surface Uneven

Reader, Springtime writes, “I have a lawn that was put on over a ledge where the house was build in 2006. Now the lawn is very uneven with dips in the surface that can twist your ankle while walking. The grass is in bad shape too and looks dead in places. One side of the lawn is sloping. What should I do?”

The Landscaping Brighton Township has given answer to this question bellow:

The Solution: How Bad Are Those Low Spots?

Most of us enjoy our turf grass lawns as a great foundation for outdoor activity. Maintaining our lawns properly is very important, in part, to ensure safe and enjoyable outdoor activity. A lawn needs to be smooth to avoid injuries that might be caused from stepping on an uneven surface. Your grass is the “floor” of an outdoor living space, and floors need to provide stability.

A level and even lawn is also easier to maintain. Who wants to mow a lawn with low spots in it, right?

Not only is it uncomfortable (as when you drive your car over potholes), but it can also cause you to scalp the grass (because, as the mower drops down when the tires pass over low spots, the level of the mower blade also drops, plunging into the higher spots and cutting the grass there much too low).

So what is the solution to the problem of low spots? It really depends on the severity: are we talking about some minor depressions, extreme cratering, or something in between? The solution differs accordingly, which is why the response must be broken up into three parts, which we will term Methods 1, 2, and 3: Landscaping Lawn Brighton MI.

timberlinelawncare.com

Method 1 — Leveling Out a Mildly Uneven Lawn by Topdressing

Topdressing the low spots works well for leveling mildly uneven areas; it is the least invasive approach. Here is what to do:

  1. According to the Lawn Care Brighton Township, in a wheelbarrow or similar container, mix up a batch of topsoil, sand, and compost — basically, a soil medium that can support turfgrass growth.
  2. Apply 1/2 inch of this soil mixture on top of the low areas. Do not make it deeper than that, because this approach must be gradual, so that you do not smother the grass.
  3. Rake the topdressing to spread it out evenly.
  4. With a push-broom, work the soil mixture in between the blades of grass as thoroughly as possible.
  5. Monitor the progress in the area. Eventually, you should see just grass, no dirt (assuming there were no bare spots before you began the process of topdressing). If it is still uneven, keep repeating these steps until it is level. If the spot is level now, then you are done.

But if you had bare spots in the area before you started topdressing it, you will have to overseed for the Lawn Service Brighton Township.

Method 2 — Leveling Out a Moderately Uneven Lawn: “Sweeping the Dirt Under the Carpet”

The topdressing process described above takes time to work. What if you have a few really low spots in your lawn? Obviously, topdressing would not be very effective, because (since you have to proceed 1/2 inch at a time) you would be waiting forever. Yet, since, it is only a few low spots that we are talking about, there would be no need to take the kinds of drastic measures described in Method 3. Fortunately, there is an lawn care intermediate method. I call it “sweeping the dirt under the carpet,” because you are essentially picking up sod (the carpet) and putting dirt under it. This method works as follows:

  1. Remove the sod over the low spot (if the area is bigger than 1 foot square, cut out multiple chunks, since a piece of sod greater than 1 foot square is hard to move around without breaking) and set it aside.
  2. Shovel enough topsoil into the hole that, once you replace the sod, the area will be even.
  3. As you shovel the soil into the hole, add water. This will remove air pockets. The last thing you want is for the sod to settle after you have finished — which would defeat the whole purpose of the project.
  4. Replace the sod and water the grass.

Method 3 — How to Level Out a Lawn That Looks Like a Moonscape

Finally, we come to the most extreme end of the spectrum. Is your lawn so littered with craters that it looks like the surface of the moon? If the uneven areas are substantial enough and numerous enough that neither topdressing nor the sweep-the-dirt-under-the-carpet method will solve the problem, then you may need to do a more major renovation by regrading the area and establishing a new stand of turfgrass. To accomplish this, you need to take the same steps that you would take to establish a new lawn, except that you are applying these steps to a smaller area.

Start Sprinkler System after Winterizing

To start a sprinkler system after winterizing you must first know where the sprinkler system shut offs are. If you had an irrigation service company shut down, blow out, and drain the system sometimes it is easier just to call them back to turn it on. Many Lawn Care Wichita KS will even shut your sprinkler down for the winter and start it back up when the time comes. If you can find the main sprinkler shut off valve and have a key to turn it back on then you can turn it on yourself.

Most of the time the shut off valve for the sprinkler line is in a long irrigation tube near the sprinkler control boxes.

topnotchstripes.com

The most important thing when turning on a sprinkler system is to turn the water on slowly. You can cause a huge water hammer by turning the water on too quickly and this can burst fittings or pop off sprinkler heads. No matter which valve you are turning on make sure you open it slowly and give it time to pressurize before opening it all the way. The following steps of Lawn Service Wichita KS will guide you through the process to start a sprinkler system after winterizing.

  1. To turn a sprinkler system on located the sprinkler shut off valves. In my area, there are stop and waste valves in the ground and then pressure vacuum breakers above ground. Both of which are usually off and can shut off the sprinkler system. You can deal with your local Lawn Care Wichita professionals.
  2. Turn on the valves. The stop and waste valve in the ground requires a long meter key to reach it. Most stop and waste valves turn 90 degrees in a counter-clockwise direction to turn them on. This type of valve will sometimes leak a little when first turned on but it should be only for a short time. Keep an eye on it and make sure the valve is not continually running.
  3. Pressure vacuum breakers are usually turned on with two ball valves that are located on either side of the vacuum breaker valve. The ball valve in the parallel position means it is on while the perpendicular positions mean it is off. A quarter turn is all that is needed to turn on a ball valve. Make sure it is turned on as slowly as possible.Time to check the individual sprinkler valves.
  4. It is a good idea to remove the sprinkler head at the end of each line before turning on the sprinkler valves. This way if anything is in the line it will get flushed out and it will also protect against any water hammer in case you turn the valve on too fast. By this time you will have water to the pressure side of the valve and you can turn the sprinklers valves on one by one to see if there are any leaks in the sprinkler lines themselves. Sprinklers can be turned on at the timer or by using the manual screw that most sprinkler valves have on the side. But you can turn the system on slower if you do it manually at the individual sprinkler valves.
  5. Take your time and go through each of the sprinkler stations because if a line is broken underground it may take some time to bubble up. Dig up and repair any leaks and replace sprinkler heads that are broken. Make any necessary adjustments to the spray pattern of the sprinkler heads. Let it run a bit and check the coverage. Some spray heads may have to be cleaned out or adjusted before working properly again.
  6. Set the timer. It’s a good idea to set the watering times when you can keep an eye on the watering especially in the beginning of the season to make sure everything is working properly.

7 Lawn Care Tips to Do Right Now

It’s a well-known fact that the best way to ensure a thick, green, and healthy lawn in the spring is to give it some well-timed care in the fall—in other words, right now. But according to Lawn Care Brighton Township, a lawn care company with more than 200 franchises around the country, many homeowners make the same basic mistakes before grass goes dormant, and then wonder why their grass isn’t doing better the following year. Wonder no more. Here are seven-step program to getting a beautiful lawn next year.

timberlinelawncare.com

1. Remove the leaves.

A carpet of colorful autumn leaves may look nice and be fun to play in, but they’re no good for grass. They block the light and trap moisture, potentially fatal knockout punches for the unlucky turf underneath. So when the leaves are falling, blow or rake them away as often as you can. Even after the trees are bare, continue raking out the corners where the wind piles leaves up. If you don’t, come spring the grass under that soggy, decaying mat will be dead.

2. Keep cutting, but to the correct height.

Don’t put that mower away yet. Grass continues to grown up to the first hard frost, and so will need regular cuts to keep it at an ideal 2½- to 3-inch height. If you let it get too long, it will mat and be vulnerable to fungi like snow mold. Cutting grass too short is just as bad, because it curtails the root system—root depth is proportional to cutting height—and impedes the lawn’s ability to withstand winter cold and dryness. Regular mowing also gets rid of those pesky leaves, chopping them up and leaving behind a soil-enhancing mulch.

3. Continue watering.

Professionals of Lawn Mowing Brighton Township, say that people tend to let up on watering in the fall as the weather gets cooler. “They figure that nature will take care of things for them,” he says. While it’s true that there’s more rain, more dew, and less evaporation at this time of year, that may not be enough to keep the grass roots well hydrated and healthy going into the winter. If your lawn isn’t getting at least an inch of water a week—a simple rain gauge is a useful way to keep track—then keep the sprinklers or irrigation system running until the end of October. By that time, you’ll want to disconnect hoses and flush the irrigation system to avoid frozen pipes and spigots.

4. Loosen the soil.

Regular aeration—once every couple of years, according to We—prevents soil from becoming compacted and covered with thatch, a thick layer of roots, stems, and debris that blocks water, oxygen, and nutrients from reaching the soil. A core aerator corrects both problems by punching holes through that thatch and pulling up plugs of soil. It’s a good idea to aerate a lawn right before fertilizing. All those holes in your turf will let the fertilizer reach right to the roots, where it can do the most good.

5. Add fertilizer.

Just as grass roots need water to last the winter, they also benefit from a shot of the plant sugars that protect roots from freezing and give the entire plant the energy to bounce back in the spring. Those sugars are produced by chlorophyll, which grass produces in abundance when there’s enough nitrogen. That’s why Lawn Maintenance Brighton Township recommends a late-fall application of a slow-release granular 24-0-10 fertilizer. The numbers indicate the percentage by weight of nitrogen, phosphorus, and potassium, respectively. Potassium is also important at this time because it aids in root growth, disease protection, drought tolerance, and cold resistance. (A soil test can tell you how much of each nutrient your lawn actually needs.) The cautions against spreading fertilizer close to waterways, however; they are vulnerable to contamination from runoff. Lawn Doctor’s company policy is to maintain a 5-foot buffer wherever water is present.

6. Spread seed.

A dense lawn also is good protection against weeds, which is why it’s important to overseed existing turf. Not only does that fill in thin spots or bare patches, it allows you to introduce the latest in resilient, drought-tolerant grasses. Fall is the best time to overseed because the ground is still warm, moisture is more plentiful, nights are cool, and the sun is not as hot during the day. But even then, “overseeding is one of the most challenging lawn-care chores. You can’t simply broadcast seeds over an established lawn and expect them to take hold. They need to be in full contact with the soil, kept moist until they germinate, and be well enough established before it gets too cold. Renting a slit seeder is a better option than broadcasting, but those machines are notorious for tearing up turf and leaving your lawn looking like a harrowed field.

7. Stay on schedule.

According to the Landscaping Brighton Township each of the steps above has to be done at the right time for best results. Otherwise, it’s wasted effort. For instance, overseed too late and the seedlings will be too tender to survive. Fertilize too early and the grass will send up tender blades that will get hammered by the cold. Fertilize too late and the grass roots won’t be able to absorb all those nutrients you’re feeding them. Thinking about aerating in the spring because you can’t get around to it this fall? Don’t bother. Spring aeration just makes it easier for weed seeds to get established.

If sticking to the schedule during the fall is proving too difficult, a lawn care service can handle the jobs that aren’t getting done. Most often, those are the ones that require renting heavy machinery like core aerators and slit seeders, which are hard to transport, a bear to operate, and often in short supply at the rental yards at this time of year. Delegating one or two of those chores to a pro during this busy season will ensure the work gets done when it should—and that you will be enjoying a thick carpet of green grass next year.